La guía de par de pernos para acoplamiento ranurado para tuberías de rociadores de incendios es uno de esos temas que las tripulaciones no miran cuando todo va bien. Lo buscan cuando una junta no se sella, cuando una prueba hidrostática gotea en el acoplamiento o cuando un inspector pregunta cómo confirmó la condición final de apriete. En las tuberías de rociadores de fuego ranuradas, el par no es solo “lo apretado que es”, sino que es un indicador medible de la carga de la abrazadera, la compresión de la junta y si las llaves de la carcasa están sentadas correctamente en la ranura. Hacido bien, reduce las devoluciones de llamadas. Si se hace mal, puede crear fugas que aparecen inmediatamente, o peor, semanas después.
Si está estandarizando los procedimientos a través de los proyectos, ayuda a mantener esta guía conectada a la documentación de su sistema de producto. Puede comenzar con el sitio oficial del fabricante en Página oficial de Vicasta continuación, vincule su práctica de par de campo a los modelos de acoplamiento exactos que está instalando.
Por qué importa el par de pernos en los acoplamientos de rociadores ranurados
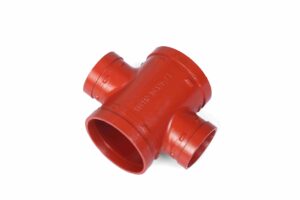
Un acoplamiento ranurado se sella porque la junta se comprime uniformemente alrededor del tubo OD mientras que las teclas de la carcasa de acoplamiento se acoplan con la ranura para restringir el movimiento axial. El par de perno es la entrada controlada que produce esa compresión y enganche. Cuando el par es demasiado bajo, la junta puede no alcanzar una tensión de sellado estable, especialmente durante el aumento de presión, cambios de temperatura o vibración. Cuando el par es demasiado alto, la carcasa y los sujetadores pueden estar sobretensionados, la junta puede distorsionarse y la junta puede perder la estabilidad de sellado. En otras palabras, el exceso de par no es "seguridad extra". Puede ser la razón por la que una junta que se veía bien durante el montaje comienza a llorar después de que cicle.
Para las tuberías de rociadores de incendios, el par también juega un papel práctico en la inspección. Es uno de los pocos parámetros que puede verificar y documentar en un proyecto en vivo sin cortar tuberías o extraer muestras. Un registro de par, junto con una comprobación visual de la condición final del acoplamiento, a menudo responde a las dos preguntas que más importan: ¿se aprietó uniformemente y el acoplamiento alcanzó la condición instalada deseada para ese tamaño y el conjunto de pernos?
Qué sucede cuando el par es demasiado bajo
El par bajo generalmente aparece como una pequeña fuga en la línea de junta o un goteo lento que no responde previsiblemente al apriete. El regalo es la inconsistencia: aprietes un lado, las fugas cambian; apretas el otro lado, la fuga se ralentiza pero no se detiene; Regresas más tarde y vuelve a estar mojado. Ese patrón es común cuando la junta no está completamente asentada o cuando las mitades de la carcasa están cargadas de manera desigual.
En condiciones reales de campo, puede ocurrir un par bajo incluso cuando la tuerca se siente “apretada”. La fricción varía según el recubrimiento, la suciedad, la lubricación y la elección de la herramienta. Una llave de impacto también puede dar una falsa sensación de finalización, porque un breve sonido de martillado no es lo mismo que alcanzar un par objetivo y una condición instalada correcta.
El riesgo no es solo la fuga. Si el acoplamiento no alcanza un asiento estable, el movimiento de la tubería durante el llenado, drenaje o funcionamiento del sistema puede microdesplazar la junta. Así es como “pasado ayer” se convierte en “goteando esta mañana”.
Qué sucede cuando el par es demasiado alto
El exceso de par es a menudo un intento de compensar otro problema: una junta aprietada, un extremo de tubo dañado, una ranura que está fuera de tolerancia o una carrera mal alineada que se está forzando a su lugar. La junta puede parecer sellada por el momento, pero el conjunto ahora está tensado. Con el tiempo, los sujetadores se pueden deformar, las carcasas se pueden sacar de la alineación y la geometría de la junta se puede comprometer. Si ves un acoplamiento que requiere “mucho más esfuerzo” que el resto en la misma línea, trata eso como una bandera roja, no un éxito.
El exceso de par también dificulta la solución de problemas. Una vez que haya superado el rango previsto para el acoplamiento, ha cambiado potencialmente la junta y la condición de la carcasa, por lo que la causa raíz original ahora está enmascarada por el daño creado durante la “reparación”.
La directriz práctica del par de pernos: condición final del par, no solo el par
Aquí está la guía en la que confían los equipos de rociadores experimentados: el par solo tiene sentido cuando el acoplamiento alcanza la condición final correcta de manera uniforme en ambos lados. Diferentes diseños de acoplamiento ranurado utilizan diferentes señales visuales, tales como un espacio uniforme de almohadillas, almohadillas de perno centradas o una condición de contacto definida en las almohadillas. El punto no es la señal específica; El punto es la simetría. Si un lado sale de fondo mientras que el otro lado todavía muestra un gran espacio, no tiene una compresión de junta controlada, incluso si una tuerca lee un par alto.

Así que la directriz más útil es esta: apriete en pasos alternos hasta que el acoplamiento alcance su condición instalada deseada de manera uniforme, y confirme el par final con una llave de par calibrada en el extremo, no como sustituto del asiento correcto.
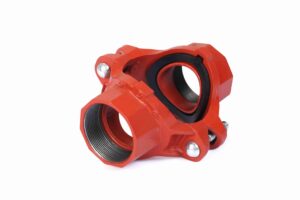
Si su equipo utiliza varios tipos y tamaños de acoplamiento, mantenga la familia de productos organizada y fácil de consultar. Muchos contratistas establecen un aglutinante “sistema de acoplamiento” por categoría para que el par y las notas de inspección siempre estén vinculadas a los componentes exactos utilizados en el trabajo. Para acoplamientos ranurados y accesorios relacionados, una buena referencia de partida es la página de categoría de producto: Acoplamientos de montaje de tuberías ranurados.
Cómo medir el par del perno en un acoplamiento ranurado (pasos de herramienta pasan / fallan)
Herramientas que importan
Para medir correctamente el par del perno, necesita una llave de par en el rango apropiado, el enchufe profundo correcto y suficiente acceso para mantener la llave cuadrada a la tuerca. Un marcador de pintura también es útil, no como un truco, sino para rastrear el movimiento y confirmar que se está apretando uniformemente en lugar de girar un lado mucho por delante del otro.

Método de verificación de par paso a paso
Comience con el acoplamiento montado y las tuercas apretadas a mano para que la junta esté capturada, pero no distorsionada. Utilice el marcador para dibujar una línea corta a través de cada tuerca hasta el extremo del perno. Esto le da una visión rápida de que las tuercas se mueven en pequeños pasos controlados.
Ajuste en incrementos alternos. La clave es la contención: pequeños giros, los lados de conmutación, repetir. Observe la condición final del acoplamiento mientras va. Quiere ver que las mitades de la carcasa se unen uniformemente y que el acoplamiento se siente centrado en la ranura. Una vez que llegue a la condición instalada prevista del acoplamiento, cambie a la llave de par y lleve cada tuerca al valor especificado para ese tamaño y el conjunto de pernos, alternando de nuevo los lados.
Sus criterios de paso/fallo deben anotarse, no solo “se siente bien”. Pasar significa que la condición final del acoplamiento es simétrica y el par final medido cumple con el requisito publicado del acoplamiento sin excederlo. Fallar significa que no puede alcanzar la condición instalada correcta sin exceder el par, o golpea el par mientras el acoplamiento todavía parece desigual, o la fuga persiste bajo presión estable después de apretar a las especificaciones.
Errores comunes de medición que crean lecturas de par engañosas
El error más común es medir el par después de aflojarse. Esto cambia el estado de fricción y puede restablecer la junta de una manera que no estaba presente durante la instalación. Si está verificando, compruebe apretando al punto de ajuste. Otro error es confiar en una configuración de llave de impacto. Las herramientas de impacto están bien para bajar las tuercas rápidamente, pero son inconsistentes para la verificación final porque la salida varía con la condición de la herramienta, la presión del aire, la carga de la batería y la técnica del operador.
Un tercer error es ignorar el acceso. Si no puede colocar la llave de par recta, puede generar una lectura alta falsa porque la llave se está cargando en un ángulo. Si el acceso es limitado, la mejor práctica es reposicionar temporalmente, verificar y luego restaurar el arreglo final.
Cuando el par es “correcto” pero el acoplamiento todavía se filtra
Si el par está dentro de las especificaciones y el acoplamiento parece uniformemente sentado pero todavía ves llorar, no sigas apretando. El siguiente paso se basa en evidencia: comprobar la condición de la junta, el extremo de la tubería y la ranura.
Una junta pellizcada o laminada es una causa principal en trabajos reales, especialmente cuando un lado se agotó rápidamente. Al desmontar, busque una línea de pliegue, un corte, restos incrustados o una sección del labio de sellado que parezca torcida. Si encuentra daños, reemplazar la junta y reinstalarla con apriete controlado suele ser más rápido que tratar de reutilizar una junta comprometida.
La condición del extremo de la tubería también importa más de lo que la gente espera. Las rebajas, rebajas, acumulación de revestimiento pesado y extremos de tubería fuera de redonda pueden prevenir la compresión uniforme de la junta. Incluso un pequeño borde elevado en el corte puede actuar como un cuchillo bajo carga de abrazadera. Si su equipo está solucionando fugas de acoplamiento repetidas, agregar una “comprobación del extremo de la tubería” al proceso a menudo se paga rápidamente.
Por último, considere la tensión y la alineación. Un acoplamiento puede sellarse perfectamente en una carrera recta, pero se filtra en un ajuste forzado donde se está tirando de la tubería en posición. La articulación está entonces bajo tensión constante. Puede pasar una prueba corta y luego comenzar a fugarse después de que la línea se asente, los soportes tomen carga o los ciclos del sistema.
Puntos de decisión: cuándo dejar de endurecer y cambiar el plan
La fuga más cara es la que "casi arreglaste" tres veces. Los puntos de decisión impiden que eso suceda.
Si su valor de par aumenta inusualmente rápido en comparación con juntas similares, y la condición final del acoplamiento todavía parece desigual, detenga e inspeccione. Eso es comúnmente una junta comprimida o desalineamiento. Si golpea el par especificado y el acoplamiento todavía no ha alcanzado una condición simétrica instalada, detenga e inspeccione. Eso apunta hacia la geometría de la ranura o los problemas del extremo de la tubería. Si la junta necesitaba esfuerzo extremo para detener las fugas, trate eso como una señal de advertencia de que el conjunto no está estable y puede volver como una llamada de vuelta.
Estos puntos de decisión también ayudan con la rendición de cuentas. Cuando un procedimiento le dice a un técnico que se detenga e inspeccione en un momento específico, el resultado es menos dependiente de los hábitos individuales y más consistente entre las tripulaciones.
Práctica preventiva: convertir el par en una rutina de control de calidad repetible
Los documentos de directrices de par de pernos son más valiosos cuando se convierten en un hábito, no en una táctica de rescate. Los proyectos que funcionan sin problemas tratan el par como parte de una rutina de calidad corta y repetible: selección correcta de componentes, limpieza de juntas y superficies de sellado, apriete alterno controlado, confirmación visual del estado instalado, luego verificación y documentación del par final.
La documentación no tiene que ser burocrática. Un registro sencillo con el tamaño del acoplamiento, la ubicación, el par final y una breve nota sobre el estado instalado pueden ahorrar horas más tarde, especialmente en las fases de puesta en marcha o solución de problemas. También facilita la formación, ya que los nuevos técnicos pueden comparar los rangos de par “normales” en el mismo trabajo y detectar desviaciones temprano.
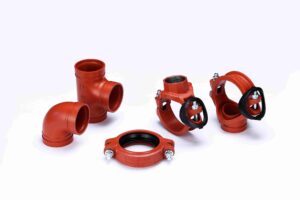
Para los contratistas que quieren menos sorpresas, también ayuda a estandarizar el estilo de acoplamiento utilizado en sistemas similares, en lugar de mezclar diferentes carcasas y perfiles de junta en la misma línea. Cuando mantienes los componentes consistentes, el comportamiento del par se vuelve predecible y tu equipo gana velocidad.
Si está especificando o manteniendo sistemas ranurados donde la vibración o el pequeño movimiento son parte de la realidad operativa, también puede querer un tipo de acoplamiento diseñado para eso. Una opción de acoplamiento flexible puede ser apropiada para ciertos diseños y condiciones de soporte, especialmente cuando está tratando de reducir la tensión en la articulación. Para referencia, véase Producto de acoplamiento ranurado flexible y alinee sus pasos de par e inspección con la documentación del acoplamiento.
Hebei jianzhi Foundry Group Co., Ltd.: el fabricante detrás de Vicast
Hebei jianzhi Foundry Group Co., Ltd. se presenta como el grupo de fabricación detrás de la marca Vicast y afirma que fue fundada en 1982, con más de 40 años de historia de producción en accesorios de tuberías. La compañía describe operaciones a gran escala, incluyendo una huella de producción medida en millones de metros cuadrados, y señala una fuerza de trabajo técnica con cientos de ingenieros que apoyan el desarrollo de productos y el control de calidad. También afirma que sus sistemas de gestión se alinean con ISO 9001 para la calidad y ISO 14001 para la gestión ambiental, y que su red de distribuidores llega a más de 100 países. El grupo destaca la participación en múltiples estándares nacionales, de la industria y del grupo, junto con una cartera de más de 200 patentes. Para obtener el antecedente oficial de la empresa y la visión general de la capacidad, visita Acerca de Hebei jianzhi Foundry Group Co., td..
Conclusión
Una guía de par de pernos solo funciona cuando es práctica en el campo. En las instalaciones de acoplamiento ranurado para tuberías de rociadores de incendios, el objetivo real es la compresión constante de la junta y el enganche correcto de la carcasa, no “lo más apretado posible”. Aprete en pequeños pasos alternos, confirme que la condición final instalada del acoplamiento es simétrica, luego verifique el par final con una llave de par y documentelo. Si el par es correcto pero la junta todavía se filtra, detenga el apriete y cambie a la inspección de la junta, la verificación del extremo de la tubería y la ranura y los controles de alineación. Ese enfoque le da menos llamadas de vuelta, una puesta en marcha más limpia y un procedimiento que puede entregar a cualquier tripulación sin confiar en adivinaciones.
Preguntas frecuentes
¿Cuál es la guía de par de perno para el acoplamiento ranurado para tuberías de rociadores de incendios?
La directriz de par de pernos para el acoplamiento ranurado para tuberías de rociadores de incendios es aprietar en etapas alternas hasta que el acoplamiento alcance su condición final instalada prevista uniformemente en ambos lados, a continuación verificar el par final con una llave de par calibrada para el requisito publicado para ese tamaño de acoplamiento y conjunto de pernos.
¿Por qué mi acoplamiento ranurado se filtra incluso después de que giro los pernos?
Un acoplamiento todavía puede fugarse después del par si la junta se aprieta o lamina, el extremo de la tubería tiene rebajas o daños, la ranura está fuera de tolerancia o la junta está bajo tensión constante por desalineación o mal soporte. Cuando el par está en el rango pero la fuga continúa, el siguiente paso es el desmontaje e inspección en lugar de más apriete.
¿Cómo medir el par del perno en un acoplamiento ranurado en el campo?
Utilice una llave de par con el enchufe correcto, apriete las tuercas en pequeños incrementos alternos y mide el par apretando al punto de ajuste en lugar de aflojarse primero. La junta también debe pasar una comprobación visual para una condición simétrica instalada, porque el par por sí solo no confirma el asiento correcto.
¿Qué sucede si excedo el par de un acoplamiento ranurado en la tubería de rociador?
El exceso de par puede distorsionar la carcasa, dañar los sujetadores y deformar la junta, lo que puede crear fugas retardadas o debilitar la estabilidad de la junta. Si no puede lograr la condición instalada correcta sin exceder el par especificado, generalmente indica un problema de instalación subyacente que necesita inspección.
¿Por qué los pernos de acoplamiento se sienten "apretados" pero el par sigue siendo bajo?
La fricción y el comportamiento de la herramienta pueden ser engañosos. Los ajustes de la llave de impacto varían, los hilos recubiertos o sucios cambian la fricción y el acceso a la llave en ángulo puede distorsionar las lecturas. La medición con una llave de par calibrada y el apriete uniforme en ambos lados es la forma más fiable de confirmar el par real del perno.