If you’re wading through a piping job—maybe rigging up a fire sprinkler system in a shiny new office or tweaking an HVAC setup in a dusty old factory—you’ve likely stumbled across grooved mechanical crosses. These handy fittings make joining pipes a breeze compared to old-school welding. No torches, less fuss, and they hold strong under pressure. This guide walks you through installing a grooved mechanical cross, step by step. I’ll keep it real, tossing in tips from folks who’ve been on the job. By the end, you’ll be ready to tackle this or know what to eyeball if you’re managing a crew.
These crosses aren’t just another piece of hardware. They’re built for fast, solid connections in systems handling water, air, or industrial fluids. Imagine you’re on a site, clock ticking, and instead of slaving over threaded pipes for hours, you snap these in place. Projects finish early—sometimes days early. Mess up the install, though, and you’re staring at leaks or worse. Let’s dive in and get it right.
What Is a Grooved Mechanical Cross and Why Use One?
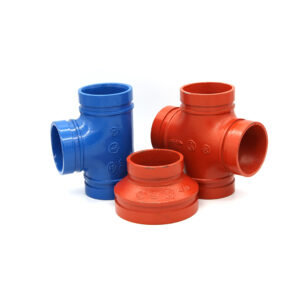
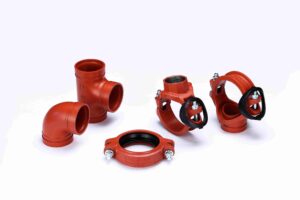
A grooved mechanical cross is a four-way fitting. It lets you branch pipes in a cross shape. Each end has grooves where couplings lock in, creating a tight seal without welding or glue. These are made tough—usually from ductile iron meeting standards like ASTM A536 Grade 65-45-12 or ASTM A395 Grade 65-45-15. They come in sizes from 2 to 10 inches (DN50 to DN250, if you’re metric-minded). They handle temps from -20°F to +180°F (-29°C to +82°C). Design-wise, they stick to specs like ISO 6182, AWWA C606, or GB 5135.11.
Why go for them? Here’s the deal:
Speedy Setup: They snap together fast, no special tools needed. This cuts labor time and saves cash.
Built to Last: Ductile iron shrugs off corrosion, pressure, and temp swings. They keep going for years.
No Leaks: The grooves and gaskets team up for a tight seal. Systems stay solid.
Flexible and Easy to Fix: You can take them apart and put them back together for maintenance or upgrades.
Wallet-Friendly: Quick installs and low upkeep make them a smart pick for budgets.
These fittings shine in fire protection, HVAC, or industrial systems. For example, in fire sprinklers, they let you tweak layouts if a building expands. In a factory, where downtime bleeds money, you can swap parts without halting the whole operation. A plumber I know swears by them for high-pressure jobs. He used them in a hospital’s HVAC system and hasn’t had a single issue in years. Once, on a humid coastal project, we swapped to grooved fittings because threaded ones were rusting too fast. It was a pain to pivot, but it saved the day.
Tools and Materials You’ll Need
Before you start, round up your gear. Nothing stinks more than stopping mid-job because you’re short a gasket. Here’s what you need:
Grooved mechanical cross (match it to your pipe size, like 4-inch for standard lines).
Grooved pipes—ends must be clean, no dents or burrs.
Couplings and gaskets (EPDM or nitrile, depending on the fluid).
Torque wrench—shoot for 30-50 ft-lbs, but check the specs.
Pipe cutter or grooving tool for on-site prep.
Water-based lubricant for gaskets (avoid oily stuff; it can wreck the seal).
Safety gear: gloves, goggles, maybe earplugs if the site’s loud.
Measuring tape and level for alignment.
Quick tip: Always double-check your materials against the job’s requirements. If your system’s pushing 300 PSI, make sure the cross can handle it. I’ve seen mismatched fittings fail, and it’s a mess. Stock up on spares, too. On one job, we tore a couple of gaskets during install. Running to the store cost us half a day. Better to have extras.
Step-by-Step Installation Guide
Here’s the nitty-gritty on how to install a grooved mechanical cross. We’ll assume your pipes are pre-grooved. If not, use a roll groover first. Safety comes first—shut off pressure, drain lines, and tag out if needed.
Step 1: Check Your Gear
Look over your pipes and cross. Spot any damage, dirt, or flaws. If the grooves are dirty, scrub them with a wire brush. Measure the pipe ends—they need to be square, within 1/16 inch. Why? Crooked cuts mess up the seal. Industry stats say 90% of leaks come from bad prep. Don’t skip this.
Step 2: Lube the Gaskets
Grab a gasket and dab on some water-based lubricant. Slide it over the pipe end. Make sure it sits flat in the groove. Don’t twist it—that can cause bunching. Do the same for all four outlets on the cross. It’s a small step, but skip it, and you’re in for trouble. I saw a rookie skip the lube once. The gasket tore, and we had to start over. Not fun.
Step 3: Line It Up
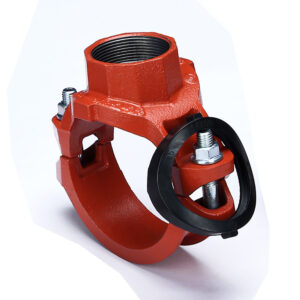
Set the cross between the pipes. Slide the pipes into the cross until they hit the stop—you’ll feel it. Then bring in the couplings. Place the housing over the grooves, insert bolts, and tighten by hand. Use a level here. Even a slight tilt can stress the joint. Take your time; rushing leads to leaks.
Step 4: Tighten It Right
Grab your torque wrench. Tighten bolts in a star pattern—alternate sides to keep pressure even. For a 4-inch cross, aim for about 40 ft-lbs, but check the manufacturer’s sheet. Too much torque can crush the gasket. Too little, and it might slip. Tighten in stages: half strength first, then full. Give it a shake—it should feel solid as a rock.
Step 5: Test It Out
Time to pressure test. Slowly bring the system up to operating pressure. Watch for leaks. Brush soapy water on the joints—bubbles mean a problem. If it holds, you’re golden. For fire systems, follow NFPA rules, like a 200 PSI hydrostatic test for two hours. I heard about a Beijing project—the National Stadium from the 2008 Olympics—where these fittings passed tough tests, even handling seismic shakes. If you spot an issue, take it apart and redo it. Better now than after the system’s live.
Common Mistakes to Avoid and Pro Tips
Nobody gets it perfect every time. Here are some slip-ups to dodge:
Skipping Inspections: This causes most install issues—about 70%, based on plumbing chats I’ve seen online.
Wrong Gasket: Use nitrile for oily fluids, EPDM for water. Mix them up, and you’re asking for leaks.
Bad Alignment: A few degrees off can strain the joint. Use a level every time.
Some pro tips to make it smoother:
Work with a buddy on bigger sizes. Those 10-inch crosses are heavy.
In cold weather, warm gaskets a bit. They stiffen up below 40°F.
Snap photos and log torque readings. It’s a lifesaver for warranties.
In earthquake-prone areas, add sway braces. I saw this save a system during a small tremor out west.
Oh, and here’s a random thought: I once worked a site where the crew blasted music to stay pumped. Kept us moving, but don’t let it distract you from double-checking your work.
Why Choose Vicast as Your Grooved Pipe Fitting Mechanical Cross Supplier

When picking a supplier, Vicast stands tall. Started in 1982 under Hebei Jianzhi Foundry Group, they’ve got over 40 years of experience making top-quality grooved fittings. Their factory spans 1.4 million square meters, with 4,500 workers, including 350 engineers. They follow ISO 9001 for quality and ISO 14001 for eco-standards. They’ve earned over 200 patents and helped write national standards like GB/T3287.
Their grooved mechanical crosses, like the XGQT18, are built for tough jobs in HVAC, fire protection, and more. They use up to 98% recycled materials, which is great for the planet without cutting corners on durability. With distributors in over 100 countries, they’ve left their mark on projects like the Beijing Olympics and skyscrapers like CITIC Tower. If you want reliable fittings and a supplier that offers custom solutions with solid support, Vicast’s the one.
Conclusion
Installing a grooved mechanical cross isn’t brain surgery, but getting the details right keeps your system tight and trouble-free. Stick to these steps, steer clear of common mistakes, and you’ll save time and stress. Whether you’re a pro or just learning the ropes, these fittings make projects smoother. Ready to try it? Your next job might just go off without a hitch.
FAQs
What tools do I need for how to install a grooved mechanical cross?
Just the basics: torque wrench, lubricant, safety gear. A pipe groover helps if you’re prepping pipes on-site. Step-by-step instructions always start with checking your gear—don’t skip a measuring tape.
Can a grooved mechanical cross handle high heat?
Yeah, up to +180°F for standard models. For hotter systems, talk to your supplier about custom options. Step-by-step instructions stress matching the fitting to your conditions.
How long does it take to install a grooved mechanical cross?
For a 4-inch cross, about 10-15 minutes if everything’s prepped. Bigger ones take more time, especially in tight spots. Follow the step-by-step instructions to avoid do-overs.
Are grooved mechanical crosses better than threaded ones?
Often, yeah. They’re faster to install and more flexible. No threading means less rust over time. The step-by-step instructions for grooved are simpler, especially for fixes.
What if my grooved mechanical cross leaks after I install it?
Check torque and alignment first—those are usual suspects. Take it apart, inspect the gasket, and follow the step-by-step instructions again. If it’s a material issue, hit up your supplier; good ones offer warranties.