
Putting in a grooved mechanical tee might feel like a big task if you’re new to pipe work, but it’s pretty doable once you get the hang of it. If you’re working on a small job or just starting out in HVAC or fire protection, this guide will walk you through the process. Vicast’s grooved mechanical tees, with over 40 years of solid craftsmanship behind them, are built tough and easy to set up, perfect for both newbies and pros. Let’s jump in, share some handy tips, and get you feeling good about installing a grooved mechanical tee like it’s no big deal.
Why Choose a Grooved Mechanical Tee?
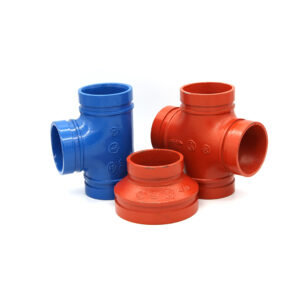
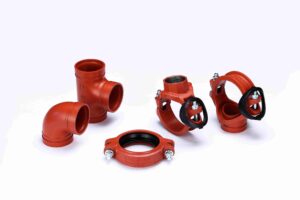
Before we roll up our sleeves, let’s chat about what makes grooved mechanical tees so great. They’re not like old-school welded or threaded fittings. These tees let you connect pipes quickly, cleanly, and with solid results. People use them in HVAC, fire protection, and industrial setups because they save time and don’t need fancy tools. Vicast’s XGQT15 Grooved Mechanical Tee, for instance, works in chilly temps down to -20°F and handles heat up to 180°F (-29°C to 82°C). It meets tough standards like ISO 6182 and AWWA C606. Plus, it’s made from sturdy ductile iron (ASTM A536 Grade 65-45-12), so it can take on high-pressure jobs without breaking a sweat.
Why do folks love these tees? They’re super quick to install—sometimes half the time of welding or threading. You don’t need flames or heavy gear, which is awesome for tight spots. They’re also dependable, with precise machining for a tight, leak-free seal. And they work with pipes from 1½” to 10” (DN40 to DN250), so they fit all sorts of projects. I remember watching a contractor zip through a fire sprinkler job using grooved fittings. He was done so fast, he had time to grab a coffee while the welding crew was still sweating it out.
Tools and Materials You’ll Need
You’ll want to gather some basic gear before you start. Most of this stuff is probably already in your toolbox, but check to avoid a last-minute run to the store.
| Item | Purpose |
| Grooved Mechanical Tee | The main piece (e.g., Vicast XGQT15) |
| Compatible grooved pipes | Make sure they’re the right size (1½”–10”/DN40–DN250) |
| Gasket | Keeps the connection tight and leak-free |
| Coupling bolts and nuts | Holds the tee to the pipe |
| Torque wrench | Gets bolts tightened just right |
| Pipe cutter or saw | Cuts pipes to the right length |
| Deburring tool | Smooths out pipe ends for a clean groove |
| Groove rolling machine | Makes grooves on pipe ends |
| Lubricant (soap-based) | Helps the gasket slide on easily |
| Measuring tape and marker | Makes sure cuts and alignment are spot-on |
| Safety gear (gloves, goggles) | Keeps you safe while cutting and assembling |
Vicast’s tees come with a data sheet that lists torque specs, usually between 30 and 60 ft-lbs, depending on the size. Check that manual before you dive in—it’s a game-changer.
Step-by-Step Guide to Installing a Grooved Mechanical Tee
Ready to get going? Follow these steps, and you’ll have that tee installed in no time. I’ve tossed in some real-world pointers to help you dodge common slip-ups.
Step 1: Plan Your Piping Layout
First things first, map out your pipe system. Figure out where the tee needs to go. Are you adding a branch for a fire sprinkler, an HVAC line, or something industrial? Grab a measuring tape and mark where the tee will connect. Sketch it out if it helps. Measure twice, cut once, as the old saying goes. Getting this right saves you from headaches later.
For example, say you’re setting up a fire protection system. You might need a 4” tee to branch off the main water line to feed sprinkler heads. Make sure the branch lines up with your setup. Skip this step, and you might end up with misaligned pipes or leaks, which is no fun to fix.
Step 2: Cut and Prepare the Pipe
Grab your pipe cutter or saw and trim the pipes to the right length. Keep those cuts straight—jagged ends can mess up the groove and cause leaks. Once you’ve cut, use a deburring tool to smooth the edges. Rough spots can nick the gasket or weaken the connection.
I’ve seen new folks skip deburring, thinking it’s not a big deal. Big mistake. A tiny burr can lead to a slow drip that’ll drive you nuts down the road. Take the extra minute to do it right.
Step 3: Create the Groove
A grooved mechanical tee needs pipes with grooved ends. You’ll use a groove rolling machine to make those grooves, following the specs in Vicast’s manual (they stick to AWWA C606 standards). The groove’s depth and width have to be just right for a snug fit.
After grooving, check the pipe ends. The groove should be clean and even, with no bits of metal or dirt hanging around. A quick wipe with a rag does the trick. Oh, and groove rolling machines are loud. Pop on some ear protection unless you want that buzzing in your head all night.
Step 4: Inspect and Lubricate the Gasket
Take the gasket that comes with your Vicast tee and give it a good look. Check for cracks or tears. If it’s damaged, swap it out. Then, dab a thin layer of soap-based lubricant on the gasket’s outer surface. This helps it slide onto the pipe and sit nicely in the groove.
Why soap-based? Other lubricants, like silicone or oil-based ones, can wear down the gasket over time. Stick with what Vicast suggests. I heard about a guy who used motor oil once—yep, really. The gasket gave out in a month. Don’t be that guy.
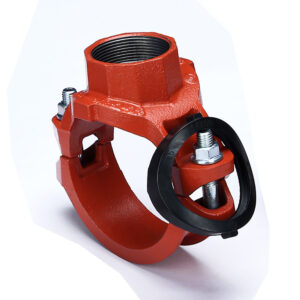
Step 5: Assemble the Tee
Now, let’s put it together. Slide the lubricated gasket over the grooved end of the main pipe. Make sure it sits evenly in the groove. Next, place the mechanical tee over the gasket, lining up the branch outlet with your planned layout. Then, fit the coupling housing around the tee and pipe. Loosely screw in the bolts and nuts to hold it in place.
Double-check that the branch outlet is pointing the right way before you start tightening. It’s a pain to reposition once the bolts are snug.
Step 6: Tighten the Bolts
Grab your torque wrench and tighten the coupling bolts in a crisscross pattern, like you’re tightening lug nuts on a car tire. This spreads the pressure evenly on the gasket. Check Vicast’s data sheet for the exact torque—overdoing it can wreck the gasket, and not tightening enough can lead to leaks.
For a 4” Vicast XGQT15 tee, you might need about 40 ft-lbs of torque. Always check the manual to be sure. Tighten slowly, going around the bolts a few times, adding a bit more pressure each go.
Step 7: Test the System
With the tee in place, it’s time to test. Pressurize the system with air or water, depending on your setup, and look for leaks. If you see a drip, don’t stress. Try tightening the bolts a tad or check if the gasket’s misaligned. Vicast’s tees are built for a tight seal, so leaks usually come from small installation slip-ups.
I was on an HVAC job once where we had a tiny leak. We loosened the coupling, nudged the gasket back in place, and tightened it up. Took 10 minutes, and we were good as new.
About Vicast: Your Trusted Grooved Mechanical Tee Supplier

When you’re picking a grooved mechanical tee, Vicast is a name you can count on. Started in 1982, Hebei Jianzhi Foundry Group Co., Ltd., the folks behind Vicast, have been making top-notch pipe fittings for over four decades. Their factory spans a massive 1.4 million square meters, with 4,500 workers, including 350 skilled engineers. Vicast’s products meet strict ISO 9001 and ISO 14001 standards. Their XGQT15 tees have been used in huge projects across China, like the Beijing Olympic venues and the Canton Tower. With over 200 patents and distributors in more than 100 countries, Vicast blends innovation, toughness, and great service to make your piping projects shine.
Conclusion
Installing a grooved mechanical tee isn’t as tricky as it seems. With the right tools, a little prep, and this guide, you can handle it like a seasoned pro. Vicast’s high-quality tees make the job even smoother, offering strength and precision that folks in the industry swear by. Whether you’re working on a fire sprinkler system, an HVAC line, or an industrial setup, these steps will get you a solid, leak-free connection. So, grab your torque wrench, and let’s get that piping system looking sharp!
FAQs
What tools do I need to install a grooved mechanical tee?
You’ll need a pipe cutter, deburring tool, groove rolling machine, torque wrench, measuring tape, marker, and safety gear like gloves and goggles. The Vicast tee comes with a gasket and coupling bolts, so don’t forget those.
Can I install a grooved mechanical tee without a groove rolling machine?
Nope, you need a groove rolling machine to make the grooves just right. Without it, the tee won’t seal properly, and you’ll likely end up with leaks.
How do I know if my grooved mechanical tee is installed correctly?
Pressurize the system after you install a grooved mechanical tee. Check for drips. If the bolts are tightened to the right torque (say, 40 ft-lbs for a 4” Vicast tee) and there’s no leaking, you’re golden.
Are Vicast’s grooved mechanical tees good for high-pressure systems?
You bet. Vicast’s tees, like the XGQT15, are made for tough jobs like HVAC and fire protection. They’re crafted from strong ductile iron and meet standards like ISO 6182.
How long does it take to install a grooved mechanical tee?
If you’re new, it might take 20–30 minutes to install a grooved mechanical tee, assuming you’ve got your pipes prepped and tools ready. With some practice, you can probably do it in half that time.